How to take a screenshot on a chromebook – Embark on a comprehensive exploration of screenshot techniques for Chromebooks, unveiling the diverse methods and advanced options that empower you to effortlessly capture and share your digital moments.
From the convenience of keyboard shortcuts to the versatility of third-party extensions, this guide provides a detailed roadmap for mastering the art of Chromebook screenshots.
Overview of Screenshot Methods on Chromebooks
Chromebooks offer multiple methods for capturing screenshots, each with its advantages and drawbacks. Understanding these methods allows users to select the most suitable option for their needs.
The primary methods for taking screenshots on Chromebooks are keyboard shortcuts, the screen capture tool, and third-party extensions.
Keyboard Shortcuts
Keyboard shortcuts provide a quick and convenient way to capture screenshots. The most commonly used shortcut is the “Ctrl” + “Show Windows” keys, which captures a full-screen screenshot. To capture only a portion of the screen, users can press “Ctrl” + “Shift” + “Show Windows,” then drag the cursor to select the desired area.
Screen Capture Tool
The built-in screen capture tool offers more advanced screenshot options. To access it, press “Ctrl” + “Shift” + “Show Windows,” then click the “Screen Capture” icon in the bottom right corner of the screen. This tool allows users to select specific areas of the screen, add annotations, and save screenshots in various formats.
Third-Party Extensions
Chrome Web Store offers a wide range of third-party extensions that enhance screenshot functionality. These extensions provide additional features such as scrolling screenshots, automatic saving to cloud storage, and advanced editing tools.
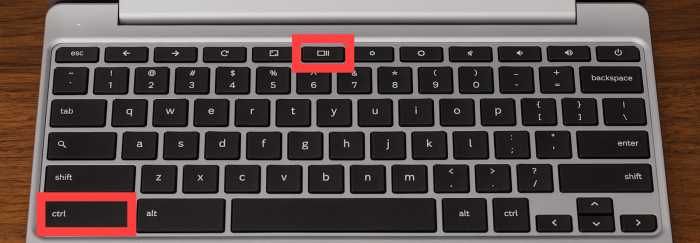
Using the Keyboard Shortcut
Capturing a screenshot on a Chromebook is a quick and easy process using the designated keyboard shortcut. By pressing a specific combination of keys, you can swiftly take a snapshot of your screen and save it as an image file.
To utilize this method, follow these steps:
Key Combinations
- Locate the “Ctrl” key, typically found on the bottom left corner of the keyboard.
- Identify the “Shift” key, usually positioned directly above the “Ctrl” key.
- Press and hold both the “Ctrl” and “Shift” keys simultaneously.
- While holding down “Ctrl” and “Shift,” press the “Window Switcher” key, which resembles a square with two lines inside.
Upon pressing these keys in the specified order, the screen will momentarily flash, indicating that a screenshot has been captured. The image will be automatically saved as a PNG file in the “Downloads” folder on your Chromebook.
Utilizing the Screenshot App
The Screenshot app is a pre-installed tool on Chromebooks that provides a comprehensive set of features for capturing and editing screenshots. It offers an intuitive interface and a range of options to customize the screenshot experience.To access the Screenshot app, press the “Shift” + “Ctrl” + “Show Windows” keys simultaneously.
Alternatively, you can search for “Screenshot” in the Chromebook’s app launcher.Once the app is open, you can choose from various screenshot modes:
Capture entire screen
Captures a full-screen screenshot of the current display.
Capture part of the screen
Allows you to select a specific area of the screen to capture.
Capture window
Captures a screenshot of the active window.After capturing a screenshot, the app provides editing tools such as cropping, rotating, and annotating. You can also save the screenshot as a PNG or JPEG file or copy it to the clipboard for easy sharing.
Third-Party Screenshot Extensions: How To Take A Screenshot On A Chromebook
Explore the diverse range of third-party screenshot extensions available in the Chrome Web Store. These extensions offer an array of advanced features, including annotation tools, screen recording capabilities, and image editing options.
Feature Comparison
- Annotation Tools:Highlight, draw, and add text or shapes to your screenshots for easy collaboration and feedback.
- Screen Recording:Capture videos of your screen to demonstrate processes or create tutorials.
- Image Editing:Crop, resize, rotate, and adjust the brightness and contrast of your screenshots.
Advanced Screenshot Techniques
Beyond basic screenshots, Chromebooks offer advanced techniques for capturing specific areas, scrolling content, and delaying the capture process.
Capturing Partial Screenshots
To capture only a portion of the screen, press the Shift key while using the keyboard shortcut or the Screenshot app. Drag the cursor to select the desired area.
Scrolling Screenshots
For capturing long web pages or documents, use the “Capture entire page” option in the Screenshot app. It automatically scrolls and captures the entire page, even if it extends beyond the visible area.
Delayed Screenshots, How to take a screenshot on a chromebook
To capture a screenshot after a delay, use the “Take a delayed screenshot” option in the Screenshot app. Select the desired delay (up to 10 seconds) and then perform the desired action (e.g., open a menu or start a process) before the screenshot is taken.
Saving and Sharing Screenshots

Once a screenshot is captured on a Chromebook, users have various options for saving and sharing it.
For local storage, screenshots can be saved as PNG or JPG files in the “Downloads” folder. Users can also save screenshots directly to their Google Drive account by selecting the “Save to Google Drive” option in the screenshot notification that appears after capture.
Sharing Screenshots
Sharing screenshots from Chromebooks is straightforward. Users can share screenshots via email by attaching them to messages or using Google Drive’s sharing options. Social media platforms like Facebook and Twitter also allow users to upload and share screenshots directly.
Conclusion
Whether you seek to preserve precious memories, document important information, or collaborate seamlessly, the techniques Artikeld in this guide will elevate your Chromebook screenshot skills, empowering you to harness the full potential of your device.